How to Use 7-Data Partition Recovery to Recover Data from Lost/Deleted/Damaged/Corrupted Partition
This will be a four-step tutorial which shows how to restore data from lost, deleted, damaged, corrupted partition. If you want to recover partitions of an external drive or disk, please make sure you connected the drive or disk to the PC on which you installed 7-Data Partition Recovery.
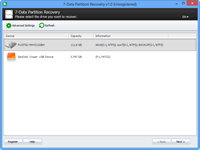
Step 1. Select the drive you want to recover partition from.
 7-Data Partition Recovery will show all the drives connected to the computer instead of showing partitions. Please select the drive which the lost/deleted partition belongs to.
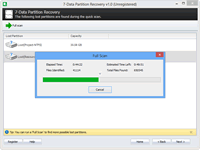
Step 2. Start scanning for lost/deleted partitions.
 Please select the drive you want to restore partition from and click “Next” button to start a “quick scan” for newly lost partition. You can perform a “full scan” after the quick scan for more possible partitions. If no partition is found after “quick scan”, 7-Data Partition Recovery will automatically run a “full scan”. After full scan, only the most possible partitions will be displayed. If you want to display more options, please click the “Show More” button.
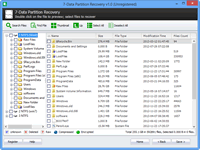
Step 3. Preview recovered data.
 After selecting the lost/deleted partition, click “Next” to browse and preview the files listed in the original tree structure of the partition. If you are recovering photos or images you may want to click the “Thumbnails” to view the photo in thumbnail instead of list. You can double click the image to preview it in another window. If you want to search for a specific file, you can use the “Search” button.
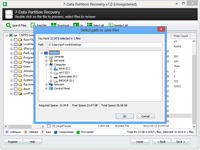
Step 4. Save recovered data.
 After you decide which files you want to recover, please select them all and click the “Save” button. If you want to restore the entire partition, just select the partition in the directory tree. Choose the path you want to save these files to and it’s done. Now you can see the recovered files in the destination folder.
